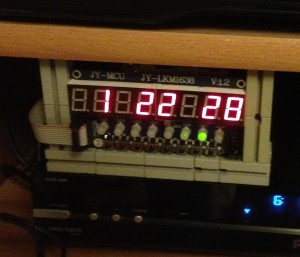
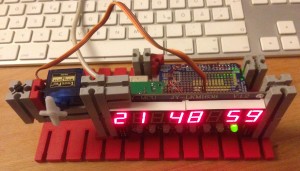
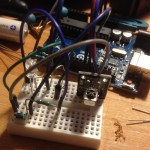
How to build an easy arduino clock. Why building a clock, since one can buy all kind of clocks? Two causes, first for the fun of it and second I can build the functions as I like and how they work. I also plan to add more functions from time to time.I wrote easy, that means not doing too much on the hardwork side. One can get an 8 7-segment LED (TM1638 LED Display Modules) with electronics, so there are only 5 wires needed for the display (and there are added 8 buttons). 5 more wires for the real time clock and off we go.
Wiring is an easy job, it’s explained in the source code. I implemented only settings for hour and minute (changing minutes also resets seconds), as I think it’s easier to set the date once with the arduino IDE. But feel free to add the extra functions.
I plan to add functions for servos and others for alarm and count down timer.
Here are the links which will help you: TM1638, Library DS1302
And here is the code:
/*
 Clock Program 2014
 by Johannes Eiseler eiseler.synology.me/wordpress
 given to public domain

shows time and date on a TM1638

use buttons for brightness, and setting hour and minute
// feel free for using it setting the date
// use the leds too


uses this libraries:
#include <TM1638.h>
#include <DS1302.h>

#include "Timer.h" // Use a timer


 */


#include <TM1638.h>
#include <DS1302.h>

#include "Timer.h" // To do it with a timer


// define a module on data pin 8, clock pin 9 and strobe pin 7
// am stecker: rot ist plus; dann in der reihenfolge: Vcc, Gnd, CLK, DIO, STB0
//TM1638 module(8, 9, 7); // data, clk, strobe

TM1638 module(8, 7, 9); // data, clk, strobe -> this is easer for wiring

// Init the DS1302
DS1302 rtc(2, 3, 4);

// DS1302: CE pin -> Arduino Digital 2 RST
// I/O pin -> Arduino Digital 3 DAT
// SCLK pin -> Arduino Digital 4 CLK
// VCC, GND, CLK, DAT, RST

Time time;
unsigned long timenumber;
String mystring = String(8);
int ss, ss1, dir;
int hh, mm;
byte bright = 3;

Timer timer;
byte mybyte;
// Status 0=zeit anzeigen
// --- erstmal nichteinstellen 1=Jahr, 2=Mon, 3=Tag, 4=DayOfWeek, 5=hh, 6=min,
// einstellen 1=HH, 2=Min, 3=Sec
int status = 0;

//Servos

void setup() {

// Serial.begin(9600);

 // Set the clock to run-mode, and disable the write protection
 rtc.halt(false);
 rtc.writeProtect(false);


 //#################################

 // The following lines can be commented out to use the values already stored in the DS1302
 // but comment in the first run
 /*
 rtc.setDOW(THURSDAY); // Set Day-of-Week to ....
 rtc.setTime(14, 40, 0); // Set the time to 12:00:00 (24hr format)
 rtc.setDate(25, 8, 2016); // Set the date to August 8th, 2016
*/

 //#################################


 // display a hexadecimal number and set the left 4 dots
 module.setDisplayToHexNumber(0x1234ABCD, 0xF0); //Test
 module.setupDisplay(true, 1);

 //Serial.begin(9600);

 timenumber = 123456;
 //Serial.begin(9600); // zum debuggen
 mybyte = 1;
 // Uhrzeit im RTC-Chip setzen nur einmal
 //RTC.setTime(&time);

 ss= 0;
 ss1=0;
 dir = 0; // Lauflicht Richtung


 timer.every(125, doTick);

}

void loop() {

 timer.update();

 byte keys = module.getButtons();

 switch(keys){
 case 0b0000001: //leftmost button
 bright++;
 if (bright >8) bright = 0;
 module.setupDisplay(true, bright);
 //module.setLEDs(0b10101010 & 0x00FF);
 module.setLEDs(bright & 0x00FF);
 delay(500);

 break;
 case 0b0000010: //leftmost + 1button Start setting
 status ++;
 if (status == 3) status = 0;
 delay(500);
 break;
 case 0b0000100: //leftmost + 2button plus hh oder min
 if (status == 1) {
 hh++;
 if (hh >= 24) hh = 0;
 rtc.setTime(hh, mm, 0);
 }
 if (status == 2) {
 mm++;
 if (mm >= 60) mm = 0;
 rtc.setTime(hh, mm, 0);
 }
 delay(250);
 break;
 case 0b0001000: //leftmost + 3button minus hh oder min
 if (status == 1) {
 hh--;
 if (hh < 0) hh = 23;
 rtc.setTime(hh, mm, 0);
 }
 if (status == 2) {
 mm--;
 if (mm < 0) mm = 59;
 rtc.setTime(hh, mm, 0);
 }
 delay(250);
 break;
 }

 delay(10);

}

void doTick(){

 // light the first 4 red LEDs and the last 4 green LEDs as the buttons are pressed
 // module.setLEDs(((keys & 0xF0) << 8) | (keys & 0xF));
 // hin und her lauflicht
 if (status < 1) {
 if (dir == 0) mybyte = mybyte << 1;
 else mybyte = mybyte >> 1;
 module.setLEDs(mybyte & 0x00FF);
 if (mybyte == 1) dir =0;
 if (mybyte ==128) dir = 1;
 }
 else {
 //module.setLEDs(0b11111111 & 0xFF00);
 module.setLEDs(0xFF00); //alle rot
 //module.setLEDs(0x00FF); //alle grün
 }
 // ende lauflicht

 //RTC.getTime(&time);
 time = rtc.getTime();

 //Serial.println(time.sec);


// my rtc seems to be buggy, so next lines to clean
 if (time.sec == 0 && time.min == 0 && time.hour == 0) { delay(10); time = rtc.getTime(); };
 if (time.sec == 0 && time.min == 0 && time.hour == 0) { delay(10); time = rtc.getTime(); };
 if (time.sec == 0 && time.min == 0 && time.hour == 0) { delay(10); time = rtc.getTime(); };
if (time.sec == 0 && time.min == 0 && time.hour == 0) return;


 //ss1 = time.getSecond();
 ss1 = time.sec;

 if (status < 1) {
 if (ss1 != ss){ //do nothing if the seconds didn't change since last display
 word decpoints = 0b00000000;

 if ((ss1 >= 20 && ss1 < 24) || (ss1 >= 40 && ss1 < 44)){
 mystring ="";
 int dd = time.date;
 if (dd < 10) mystring = mystring +" ";
 mystring = mystring + String(dd);
 int mo = time.mon;
 if (mo < 10) mystring = mystring +"0";
 mystring = mystring + String(mo);
 int yy = time.year;
 mystring = mystring + String(yy);
 decpoints = 0b01010000;
 //if (ss1 < 26) servo1.write(45);
 //if (ss1 > 39) servo1.write(135);

 }
 else {

 ss = ss1;
 //timenumber = time.getHour() * 1000;
 timenumber = time.hour * 1000;
 mystring = "";
 hh = time.hour;
 if (hh < 10) mystring = mystring +" ";
 mystring = mystring + String(hh);
 mystring = mystring +" ";
 mm = time.min;
 if (mm < 10) mystring = mystring +"0";
 mystring = mystring + String(mm);
 mystring = mystring +" ";
 //ss = time.getSecond();
 if (ss < 10) mystring = mystring +"0";
 mystring = mystring + String(ss);
 }

 module.setDisplayToString(mystring,decpoints);
 }
 }
 else //button to set the time
 {
 hh = time.hour;
 mm = time.min;

 switch(status) {
 case 1:
 mystring = "Hour" + String(hh) + " ";
 module.setDisplayToString(mystring,0);
 break;
 case 2:
 mystring = "Min " + String(mm) + " ";
 module.setDisplayToString(mystring,0);
 break;
 }
 }

}

