Bei (Computer) Mäusen, just aber auch bei einem Fernglas festgestellt, die Gummierung klebt wie Hölle, da die chemische Verbindung sich über die Zeit änderte. Geholfen hat Sowohl 80% Ethylalkohol als auch Etikettentferner. Nicht 100%, an manchen Stellen bleibt ein leicht klebriges Gefühl, aber das Fernglas ist wieder benutzbar.
Author Archives: admin
Der Staubsaugroboter und die Türschwelle
Habe überlegt wie man solch eine Rampe am besten selber bauen kann. Was so angeboten wird ist ziemlich teuer.
Die Lösung war neben dem Brett mit der Höhe der Türschwelle, ein Elektrohobel. Dann frei Hand, einen sanften Aufstieg modellieren. Und … siehe Video
![](http://eiseler.de/wordpress/wp-content/uploads/2019/07/IMG_0151-1024x768.jpg)
Kitchen Clock with Public Transport Schedule
Christian, a colleague createted a very nice project with an arduino and an e-ink display:
https://www.brokoko.eu/kitchen-clock-with-public-transport-schedule/
Unser Cozmo
Open Roberta Lab – Beispiele – Examples
Als Anregung einige Beispiele für Open Roberta.
Der Line follower als Beispiel:
Hindernis Erkennung:
Stichworte: Linie verfolgen, Beispiel, Farbsensor, color sensor, line
Arduino mirror image, orientation problem with display MAX7219
How to use MAX7219 LED Matrix with Arduino
Good Libraries to use with the MAX7219 LED are:
https://github.com/MajicDesigns/MD_MAX72XX LED
https://github.com/MajicDesigns/MD_Parola Scrolling
You’ll find lot’s of examples after you install the libraries in the Arduino IDE.
Arduino mirror image, orientation problem with display MAX7219
How to solve problem with the LED matrix MAX7219 and the MD_MAX72xx.h Library
If you have problems with mirroring and/or orientation find following line and try following solutions, Choose one:
#define HARDWARE_TYPE MD_MAX72XX::FC16_HW #define HARDWARE_TYPE MD_MAX72XX::PAROLA_HW #define HARDWARE_TYPE MD_MAX72XX::GENERIC_HW #define HARDWARE_TYPE MD_MAX72XX::ICSTATION_HW
Raspberry pi & waveshare 2.7 e-ink Display & python
Start with a headless raspberry, no need to connect monitor, keyboard: https://raspberrypi.stackexchange.com/questions/10251/prepare-sd-card-for-wifi-on-headless-pi
Find the raspberry in your router and connect with ssh. Useullay steps are:
sudo raspi-config sudo reboot
(neu einloggen)
sudo apt-get update -y
sudo apt-get upgrade -y
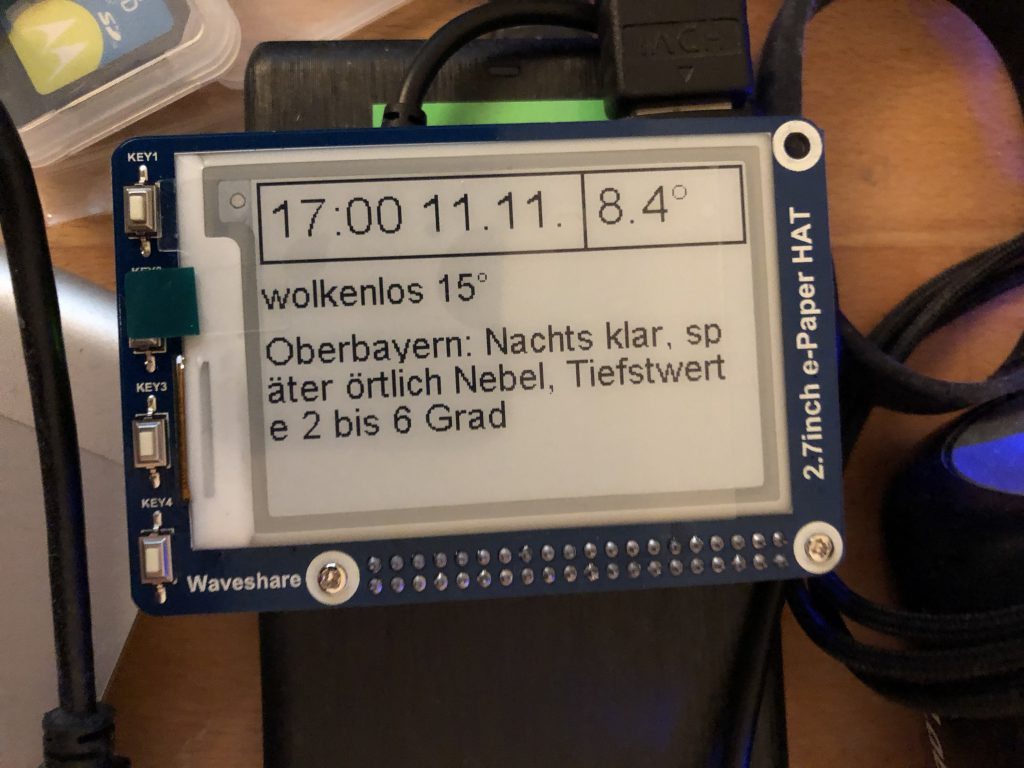
Here’s some example python code for drawing text horizontal on the waveshare e-ink display. You’ll find also a example where to find the length of text where to break lines. This examples reads some small text from a web site and looks up a rss feed for the weather.
Install the fonts https://www.raspberrypi.org/forums/viewtopic.php?t=133772
sudo apt-get install ttf-mscorefonts-installer
Install libraries https://www.waveshare.com/wiki/Pioneer600#Libraries_Installation_for_RPi
sudo apt-get install git-core
git clone git://git.drogon.net/wiringPi
cd wiringPi ./build
https://www.waveshare.com/wiki/3.7inch_e-Paper_HAT sudo apt-get install wiringpi
wget https://project-downloads.drogon.net/wiringpi-latest.deb sudo dpkg -i wiringpi-latest.deb gpio -v
cd
wget http://www.airspayce.com/mikem/bcm2835/bcm2835-1.59.tar.gz
tar zxvf bcm2835-1.59.tar.gz cd bcm2835-1.59 ./configure make sudo make check sudo make install
- Install Python2 libraries
sudo apt-get update sudo apt-get install python-pip sudo apt-get install python-pil sudo apt-get install python-numpy sudo pip install RPi.GPIO sudo pip install spidev
- Install Python3 libraries
sudo apt-get update sudo apt-get install python3-pip sudo apt-get install python3-pil sudo apt-get install python3-numpy sudo pip3 install RPi.GPIO sudo pip3 install spidev pip install feedparser
(Before running the API codes we provided, you should start up the corresponding core drivers of the interfaces. In the ready-to-use system image file, both I2C and SPI are set to Enable by default, but the serial port is still in the terminal debugging function mode.)
- Enable the I2C function. Run the following command to configure your Raspberry Pi board:
sudo raspi-config
Select
AdvancedInterface Options -> I2C -> yes, to start up the I2C core driver. Then you also need to modify the configuration file. Run the following command to open the configuration file:sudo nano /etc/modules
Add the following two lines to the configuration file
-
- i2c-bcm2708
- i2c-dev
- Press the keys Ctrl+X to exit, and input Y to save the settings. Then, reboot the module to make the settings take effect.
-
- Enable the serial function. The serial port of RPi is set to serial terminal debugging function mode by default. If you want the serial port services as a common IO, you should modify the settings on the RPi. When the terminal debugging function is disabled, you cannot access RPi board via the serial port any more. If you want to control the RPi, you may need to enable the debugging function of the serial port again.
sudo raspi-config
Select
AdvancedInterface Options -> Serial. Select the option no can disable the serial debugging function. And then, the serial port can be used for serial communication. And select the option yes can enable the serial debugging function. You should reboot the module to make the settings take effect.
- Note: the serial port on Raspberry Pi 3 Model B is unusable, because Pin 14 and Pin 15 is connected to the on-board Bluetooth model.
- Start up the spi function, run the following command:
sudo raspi-config
Select
AdvancedInterface Options -> I2C -> yes, to start up I2C core driver.
Code
# coding: utf8 ## # width 176 # height 264 ## import epd2in7 from PIL import Image from PIL import ImageFont from PIL import ImageDraw import time import urllib2 import feedparser import datetime def getLengthText(myTextInput, myFont, pixels): #font = ImageFont.truetype('/usr/share/fonts/truetype/freefont/msttcorefonts/comic.ttf', 28) #font = ImageFont.truetype("arial", 20) myText = myTextInput mlen = 0 mlen = len(myText) w, h = myFont.getsize(myText) while pixels < w: myText = myText[0:mlen-2] mlen = len(myText) w, h = myFont.getsize(myText) return mlen def addText(myImage,myText, myFont, xx,yy): #font = ImageFont.truetype('/usr/share/fonts/truetype/freefont/msttcorefonts/comic.ttf', 28) #font = ImageFont.truetype("arial", 20) w, h = myFont.getsize(myText) mask = Image.new('1', (w, h), 255) draw2 = ImageDraw.Draw(mask) draw2.text((0, 0), myText, font = myFont, fill = 0) mask = mask.rotate(90, expand=True) myImage.paste(mask, (xx,epd2in7.EPD_HEIGHT - w - yy )) def main(): epd = epd2in7.EPD() epd.init() image = Image.new('1', (epd2in7.EPD_WIDTH, epd2in7.EPD_HEIGHT), 255) # 255: clear the image with white draw = ImageDraw.Draw(image) font = ImageFont.truetype("arial", 18) font2 = ImageFont.truetype("comic", 24) font3 = ImageFont.truetype("arial", 28) # get text from a feed #d = feedparser.parse('http://www.reddit.com/r/news/.rss') d = feedparser.parse('https://www.br.de/wetter/action/feeds/bayernwetter.do') dnr = 0 dlen = len(d['entries']) #test oberbayern = 0 for n in range(dlen): actentry = d['entries'][n]['title'].encode('utf-8').strip() print str(n) + " " + actentry[0:8] if actentry[0:8] == "Oberbaye": oberbayern = n #münchen if actentry[0:8] == "München": muenchen = n print d['entries'][oberbayern]['title'].encode('utf-8').strip() print d['entries'][muenchen]['title'].encode('utf-8').strip() nb = d['entries'][oberbayern]['title'].strip() # get text from a website ttext = "err" try: #response = urllib2.urlopen('http://4johannes.de/weather/lowest.txt') response = urllib2.urlopen('http://eiseler.com/perltest/tempmysqlcoldestblank.pl') ttext = response.read().strip() print(ttext) except: print("fehler2") ttext = "err2" # add to display # first Line grad = u'°' #entlang umgerechnet oben 1,1 nach 1,264/2 draw.line((0, 264, 0, 0), fill = 0) draw.line((1, 264, 1, 0), fill = 0) addText(image, datetime.datetime.now().strftime("%H:%M %d.%m."), font3, 5, 6) addText(image, ttext + grad, font3, 5, 182) # horizontal unter der schrift: draw.line((38, 264, 38, 0), fill = 0) draw.line((39, 264, 39, 0), fill = 0) # senkrechte Linien, wenn quer gesehen draw.line((0, 264-180+5, 39, 264-180+5), fill = 0) draw.line((0, 264-180+4, 39, 264-180+4), fill = 0) draw.line((0, 263, 39, 263), fill = 0) draw.line((0, 262, 39, 262), fill = 0) draw.line((0, 0, 39, 0), fill = 0) draw.line((0, 1, 39, 1), fill = 0) muc = "München" mstr = d['entries'][muenchen]['title'].strip() mstr2 = mstr[mstr.find("):")+3:] xlen = 0 xlen = getLengthText(mstr2,font, 264) mstr3 = mstr2[0:xlen] msRest = mstr2[xlen:] xlen = getLengthText(msRest,font, 264) mstr4 = msRest[0:xlen] addText(image, mstr3, font, 40, 0) addText(image, mstr4, font, 60, 0) #addText(image, "012345678901234567890123456789", font, 60, 0) print(nb.encode('utf-8')) xlen = 0 xlen = getLengthText(nb,font, 264) nb1 = nb[0:xlen] nbRest = nb[xlen:] xlen = getLengthText(nbRest,font, 264) nb2 = nbRest[0:xlen] nbRest = nbRest[xlen:] xlen = getLengthText(nbRest,font, 264) nb3 = nbRest[0:xlen] nbRest = nbRest[xlen:] xlen = getLengthText(nbRest,font, 264) nb4 = nbRest[0:xlen] nbRest = nbRest[xlen:] xlen = getLengthText(nbRest,font, 264) nb5 = nbRest[0:xlen] print(nb1.encode('utf-8')) print(nb2.encode('utf-8')) print(nb3.encode('utf-8')) print(nb4.encode('utf-8')) print(nb5.encode('utf-8')) addText(image, nb1, font, 80, 0) addText(image, nb2, font, 100, 0) addText(image, nb3, font, 120, 0) addText(image, nb4, font, 140, 0) addText(image, nb5, font, 160, 0) #addText(image, "abcdef", font, 140, 0) #addText(image, "abcdef", font, 160, 0) epd.display_frame(epd.get_frame_buffer(image)) # display images #epd.display_frame(epd.get_frame_buffer(Image.open('demopill2.bmp'))) if __name__ == '__main__': main()
Connect Raspberry Pi & Arduino USB bidirectional
How to connect an Arduino to a raspberry pi via USB bidirectional.
The raspberry reads all from the serial and prints it. Next it reads a textile from a webpage and sends the text (one word) to serial, next a random car to the Arduino. Arduino got a LCD attached and shows the data it got via serial. It sends back the seconds it run and a string. The example is at this time without real use, it is just for testing the bidirectional serial connection.
Using Python on the raspberry side. Change the port to what you find out:
import serial import time import random import urllib2 import feedparser def read_all(port, chunk_size=200): """Read all characters on the serial port and return them.""" if not port.timeout: raise TypeError('Port needs to have a timeout set!') read_buffer = b'' while True: # Read in chunks. Each chunk will wait as long as specified by # timeout. Increase chunk_size to fail quicker byte_chunk = port.read(size=chunk_size) read_buffer += byte_chunk if not len(byte_chunk) == chunk_size: break return read_buffer #end def cars = ["Ford", "Volvo", "BMW", "VW"] ser = serial.Serial( port = '/dev/ttyACM0', baudrate = 9600, parity = serial.PARITY_NONE, stopbits = serial.STOPBITS_ONE, bytesize = serial.EIGHTBITS, timeout=0.5, # IMPORTANT, can be lower or higher ) #s = serial.Serial('/dev/ttyACM0', 9600) # Namen ggf. anpassen #s.flushInput() #s.open() time.sleep(2) # der Arduino resettet nach einer Seriellen Verbindung, daher ser.write("xyx") d = feedparser.parse('http://www.reddit.com/r/news/.rss') dlen = len(d['entries']) dnr = 0 try: while True: nb = "01234567890123456789012345678901" text = "nn.mm" data_str = [] data_str = read_all(ser) print(data_str) #nb = raw_input('Choose it: ') #nb = cars[random.randint(0,3)] + "x" try: #nb = d['entries'][dnr]['title'].encode('utf-8').strip() + "x" nb = d['entries'][dnr]['title'].encode('utf-8').strip() dnr += 1 if (dnr > dlen -1): d = feedparser.parse('http://www.reddit.com/r/news/.rss') dlen = len(d['entries']) dnr = 0 #ser.write(nb) except: print("fehler1") try: response = urllib2.urlopen('http://4johannes.de/weather/lowest.txt') text = response.read().strip() print(text) except: print("fehler2") ll = len(text) text2 = text + " " + nb[0:33-ll] + "\n" #print(text2) #ser.write(text2) #time.sleep(5) #text2 = nb[16-ll:33-ll] + "y" print(text2) print(nb) ser.write(text2) time.sleep(5) except KeyboardInterrupt: ser.close()
And this is the Arduino part:
/********************* Example code for the Adafruit RGB Character LCD Shield and Library This code displays text on the shield, and also reads the buttons on the keypad. When a button is pressed, the backlight changes color. **********************/ // include the library code: #include <Wire.h> #include <Adafruit_RGBLCDShield.h> #include <utility/Adafruit_MCP23017.h> // The shield uses the I2C SCL and SDA pins. On classic Arduinos // this is Analog 4 and 5 so you can't use those for analogRead() anymore // However, you can connect other I2C sensors to the I2C bus and share // the I2C bus. Adafruit_RGBLCDShield lcd = Adafruit_RGBLCDShield(); // These #defines make it easy to set the backlight color #define RED 0x1 #define YELLOW 0x3 #define GREEN 0x2 #define TEAL 0x6 #define BLUE 0x4 #define VIOLET 0x5 #define WHITE 0x7 byte nr; char myString[] = "Hello MArius"; String readString; long previousMillis = 0; long interval = 1000; void setup() { // Debugging output Serial.begin(9600); // set up the LCD's number of columns and rows: lcd.begin(16, 2); // Print a message to the LCD. We track how long it takes since // this library has been optimized a bit and we're proud of it :) int time = millis(); lcd.print("Hello, Marius!"); time = millis() - time; //Serial.print("Took "); Serial.print(time); Serial.println(" ms"); lcd.setBacklight(WHITE); lcd.setCursor(0, 1); } uint8_t i=0; void loop() { // set the cursor to column 0, line 1 // (note: line 1 is the second row, since counting begins with 0): //lcd.setCursor(0, 1); // print the number of seconds since reset: //lcd.print(millis()/1000); unsigned long currentMillis = millis(); if(currentMillis - previousMillis > interval) { // save the last time you blinked the LED previousMillis = currentMillis; //do nothing at the moment //Serial.println(millis()/1000); } nr = 1; if (Serial.available() > 0) { //nr = Serial.read(); //myString = Serial.readln(); //Serial.print("Folgender char wurde empfangen: "); //Serial.println(nr, DEC); char c = Serial.read(); //gets one byte from serial buffer readString += c; //makes the string readString //lcd.setCursor(5,1); //lcd.print(readString); //lcd.print(c); //readString = ""; if (c == 'x') { lcd.setCursor(0,1); lcd.print(" <"); lcd.setCursor(0,1); lcd.print(readString); Serial.println(millis()/1000); Serial.println("x/n"); readString = ""; } } uint8_t buttons = lcd.readButtons(); if (buttons) { lcd.clear(); lcd.setCursor(0,0); if (buttons & BUTTON_UP) { lcd.print("UP "); lcd.setBacklight(RED); } if (buttons & BUTTON_DOWN) { lcd.print("DOWN "); lcd.setBacklight(YELLOW); } if (buttons & BUTTON_LEFT) { lcd.print("LEFT Marius"); lcd.print(nr); lcd.setBacklight(GREEN); } if (buttons & BUTTON_RIGHT) { lcd.print("RIGHT Paulina"); lcd.setBacklight(TEAL); } if (buttons & BUTTON_SELECT) { lcd.print("SELECT "); lcd.setBacklight(VIOLET); } } }
Postgresql – Tipps and Tricks
Using PLSQL for setting Grants:
CREATE OR REPLACE FUNCTION set_all_sq_grants() RETURNS SETOF TEXT AS $BODY$ DECLARE r record; BEGIN FOR r IN SELECT sequence_name, sequence_schema FROM information_schema.sequences WHERE sequence_schema = 'xxx' LOOP -- can do some processing here EXECUTE ' Grant all on ' || r.sequence_schema || '.' || r.sequence_name || ' to userXY' ; --RETURN NEXT r; -- return current row of SELECT END LOOP; RETURN; END $BODY$ LANGUAGE plpgsql;
— und ausführen
select xxx.set_all_sq_grants();
more about Postgres PLSQL: Fun with Functions.
Some Unix (linux, Mac) Tricks and Tipps
From Isaac Sukin Command-line tip: replace a word in all files in a directory:
grep -lr --exclude-dir=".git" -e "oldword" . | xargs sed -i '' -e 's/oldword/newword/g'
VI:
Why I love VIM
cronjob: write to file:
0 8 * * * /usr/local/bin/myjob > /var/log/myjob.log 2>&1