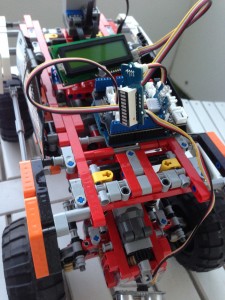
 For the evenings at late summer holidays on a small island in the German north sea I bought a Lego 4×4 Offroader to build with the kids. The truck has 4×4 driving and steering, and is controlled by an ir remote. Coming home with the built truck I was curious whether I could use an arduino to control the car.
So let’s share what I found out: The truck uses the Lego power functions (info). One could use wiring to control it, but since I got some experience with ir control, I tried it this way, so no physical connection is needed. I found three libraries out there to control Lego power functions with the arduino and ended with this one: LEGOPowerFunctions. To get it to run I had to insert the line “#include <Arduino.h> in the legopowerfunctions.h file. After that everything worked fine. Spending a lot of time with soldering in the last projects I also wanted to try a system without soldering, so I gave the grove system from seeed a try. For a small prove of concept I used an IR Emitter, a LCD Display (for debugging), a LED-Bar and an ultrasonic range sensor. And here is the (simple) code which you can use as start. It simply drives the truck forward and backs up and turn if it is approaching a wall. It also gives some simple debugging info on LCD and the LED-Bar.
define TRIGGER_PIN  2  //12  // Arduino pin tied to trigger pin on ping sensor.
#define ECHO_PIN     3  //11  // Arduino pin tied to echo pin on ping sensor.


#include <legopowerfunctions.h>

#include <SerialLCD.h>
#include <SoftwareSerial.h> //this is a must
#include "LED_Bar.h"

LED_Bar myLED;

// IR led on port 13
//LEGOPowerFunctions lego(13);
LEGOPowerFunctions lego(5);

int timeout, count;
unsigned long int distance;

SerialLCD slcd(6,7);//this is a must, assign soft serial pins

void setup()
{

  myLED.set_LED_Index(0b000001101010101);
  //Ping
  pinMode(TRIGGER_PIN, OUTPUT);
  pinMode(ECHO_PIN, INPUT);

  slcd.begin();
  // Print a message to the LCD.
  slcd.print("hello, world!");
  delay(3000);
}

void loop()
{
  while(1){

    distance = pingIt();

    if (distance <= 40) {
      slcd.setCursor(0, 1);
      slcd.print("Rueckwaerts  ");
      lego.ComboPWM(PWM_FWD7, PWM_REV6, CH2); //
      delay(700);
    }
    else
    {
      slcd.setCursor(0, 1);
      slcd.print("Forward  ");
      lego.ComboPWM(PWM_FLT, PWM_FWD6, CH2); //Forward 4WD
      delay(700);
    }

  }

  slcd.setCursor(0, 1);
  slcd.print("PWM_FWD3  ");
  lego.ComboPWM(PWM_FLT, PWM_FWD3, CH2); //Forward 4WD
  pingIt();
  delay(3000);

  slcd.setCursor(0, 1);
  slcd.print("PWM_FWD4  ");
  lego.ComboPWM(PWM_FWD7, PWM_FWD4, CH2); //Forward 4WD
  pingIt();
  delay(1000);

  slcd.setCursor(0, 1);
  slcd.print("PWM_FWD5  ");
  lego.ComboPWM(PWM_REV7, PWM_FWD5, CH2); //Forward 4WD
  pingIt();
  delay(3000);

  slcd.setCursor(0, 1);
  slcd.print("PWM_FWD6  ");
  lego.ComboPWM(PWM_FLT, PWM_FWD6, CH2); //Forward 4WD
  pingIt();
  delay(3000);

  slcd.setCursor(0, 1);
  slcd.print("PWM_FWD7  ");
  lego.ComboPWM(PWM_FLT, PWM_FWD7, CH2); //Forward 4WD
  pingIt();
  delay(3000);

  slcd.setCursor(0, 1);
  slcd.print("ComboMode  ");
  lego.ComboMode(RED_FWD, BLUE_FWD, CH2);
  pingIt();
  delay(3000);

  // }

  slcd.setCursor(0, 1);
  slcd.print("zwei  ");
  lego.ComboMode(PWM_FLT, PWM_FWD4, CH2); //Left Backward
  delay(3000);

  slcd.setCursor(0, 1);
  slcd.print("drei  ");
  lego.ComboMode(PWM_FLT, PWM_FWD7, CH2); //Left Forward
  delay(3000);

  slcd.setCursor(0, 1);
  slcd.print("vier   ");
  lego.ComboMode(PWM_FLT, PWM_BRK, CH2); //Right Forward
  delay(3000);

  slcd.setCursor(0, 1);
  slcd.print("fuenf  ");
  lego.ComboMode(PWM_FLT, PWM_REV4, CH2); // Right Backward Not Working
  delay(3000);

  slcd.setCursor(0, 1);
  slcd.print("sechs   ");

  lego.ComboMode(PWM_FLT, PWM_REV1, CH2); //Forward 4WD
  delay(3000);

  slcd.setCursor(0, 1);
  slcd.print("sieben   ");
  lego.ComboMode(PWM_FLT, PWM_REV7, CH2); //Left Backward
  delay(3000);

  slcd.setCursor(0, 1);
  slcd.print("acht   ");
  lego.ComboMode(PWM_FWD2, PWM_FLT, CH2); //Left Forward
  delay(3000);

  slcd.setCursor(0, 1);
  slcd.print("neun   ");
  lego.ComboMode(PWM_REV4, PWM_FLT, CH2); //Right Forward
  delay(3000);

  slcd.setCursor(0, 1);
  slcd.print("zehn   ");
  lego.ComboMode(PWM_FWD3, PWM_FWD3, CH2); // Right Backward Not Working
  delay(3000);

  slcd.setCursor(0, 1);
  slcd.print("zehn   ");
  lego.ComboMode(PWM_FWD3, PWM_FWD3, CH2); // Right Backward Not Working
  delay(3000);

  /*

   timeout = 5; // 5 secs
   count = 0;
   while(timeout > 0)
   {
   //lego.ComboPWM(PWM_REV4, PWM_FWD4, CH2); // 50% speed
   lego.ComboPWM(PWM_FLT, PWM_FWD4, CH2); // 50% speed
   delay(100);

   if (count++ == 1)
   {
   timeout--;
   count = 0;
   }

   }
   lego.ComboPWM(PWM_FLT, PWM_FLT, CH2); // stop
   delay(1000);
   timeout = 3; // 5 secs
   count = 0;
   */
  /*
  while(timeout > 0)
   {
   lego.ComboMode(RED_FWD, BLUE_FWD, CH2);  // turn
   delay(100);
   if (count++ == 10)
   {
   timeout--;
   count = 0;
   }
   }
   */
}

long unsigned int pingIt(){
  // Start Ranging
  long unsigned int distance;
  int ii;

  digitalWrite(TRIGGER_PIN, LOW);
  delayMicroseconds(2);  //4 2
  digitalWrite(TRIGGER_PIN, HIGH);
  delayMicroseconds(10); //20 10  5
  digitalWrite(TRIGGER_PIN, LOW);
  // Compute distance
  distance = pulseIn(ECHO_PIN, HIGH);
  distance= distance/58;

  myLED.set_LED_Range(ledBarRange(distance));

  slcd.setCursor(0, 0);
  slcd.print("         ");

  slcd.setCursor(0, 0);
  slcd.print(distance, DEC);
  //lcd_print(0, "Ping");
  //lcd_print_special(turn, distance);
  //distanceLeds(distance);
  return distance;
}

int ledBarRange(long unsigned int aD){
  if (aD <= 5) return 10;
  if (aD <= 10) return 9;
  if (aD <= 15) return 8;
  if (aD <= 20) return 7;
  if (aD <= 30) return 6;
  if (aD <= 40) return 5;
  if (aD <= 50) return 4;
  if (aD <= 70) return 3;
  if (aD <= 90) return 2;
  return 1;
}

Thank you a lot! This article put me in the way of controlling my Remote-Controlled Wheel Loader through arduino.
You are welcomed.