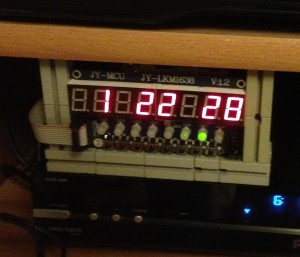
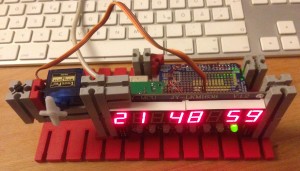
How to build an easy arduino clock. Why building a clock, since one can buy all kind of clocks? Two causes, first for the fun of it and second I can build the functions as I like and how they work. I also plan to add more functions from time to time.I wrote easy, that means not doing too much on the hardwork side. One can get an 8 7-segment LED (TM1638 LED Display Modules) with electronics, so there are only 5 wires needed for the display (and there are added 8 buttons). 5 more wires for the real time clock and off we go.
Wiring is an easy job, it’s explained in the source code. I implemented only settings for hour and minute (changing minutes also resets seconds), as I think it’s easier to set the date once with the arduino IDE. But feel free to add the extra functions.
I plan to add functions for servos and others for alarm and count down timer.
Here are the links which will help you: TM1638, Library DS1302
And here is the code:
/*
 Clock Program 2014
 by Johannes Eiseler eiseler.synology.me/wordpress
 given to public domain

shows time and date on a TM1638

use buttons for brightness, and setting hour and minute
// feel free for using it setting the date
// use the leds too


uses this libraries:
#include <TM1638.h>
#include <DS1302.h>

#include "Timer.h" // Use a timer


 */


#include <TM1638.h>
#include <DS1302.h>

#include "Timer.h" // To do it with a timer


// define a module on data pin 8, clock pin 9 and strobe pin 7
// am stecker: rot ist plus; dann in der reihenfolge: Vcc, Gnd, CLK, DIO, STB0
//TM1638 module(8, 9, 7); // data, clk, strobe

TM1638 module(8, 7, 9); // data, clk, strobe -> this is easer for wiring

// Init the DS1302
DS1302 rtc(2, 3, 4);

// DS1302: CE pin -> Arduino Digital 2 RST
// I/O pin -> Arduino Digital 3 DAT
// SCLK pin -> Arduino Digital 4 CLK
// VCC, GND, CLK, DAT, RST

Time time;
unsigned long timenumber;
String mystring = String(8);
int ss, ss1, dir;
int hh, mm;
byte bright = 3;

Timer timer;
byte mybyte;
// Status 0=zeit anzeigen
// --- erstmal nichteinstellen 1=Jahr, 2=Mon, 3=Tag, 4=DayOfWeek, 5=hh, 6=min,
// einstellen 1=HH, 2=Min, 3=Sec
int status = 0;

//Servos

void setup() {

// Serial.begin(9600);

 // Set the clock to run-mode, and disable the write protection
 rtc.halt(false);
 rtc.writeProtect(false);


 //#################################

 // The following lines can be commented out to use the values already stored in the DS1302
 // but comment in the first run
 /*
 rtc.setDOW(THURSDAY); // Set Day-of-Week to ....
 rtc.setTime(14, 40, 0); // Set the time to 12:00:00 (24hr format)
 rtc.setDate(25, 8, 2016); // Set the date to August 8th, 2016
*/

 //#################################


 // display a hexadecimal number and set the left 4 dots
 module.setDisplayToHexNumber(0x1234ABCD, 0xF0); //Test
 module.setupDisplay(true, 1);

 //Serial.begin(9600);

 timenumber = 123456;
 //Serial.begin(9600); // zum debuggen
 mybyte = 1;
 // Uhrzeit im RTC-Chip setzen nur einmal
 //RTC.setTime(&time);

 ss= 0;
 ss1=0;
 dir = 0; // Lauflicht Richtung


 timer.every(125, doTick);

}

void loop() {

 timer.update();

 byte keys = module.getButtons();

 switch(keys){
 case 0b0000001: //leftmost button
 bright++;
 if (bright >8) bright = 0;
 module.setupDisplay(true, bright);
 //module.setLEDs(0b10101010 & 0x00FF);
 module.setLEDs(bright & 0x00FF);
 delay(500);

 break;
 case 0b0000010: //leftmost + 1button Start setting
 status ++;
 if (status == 3) status = 0;
 delay(500);
 break;
 case 0b0000100: //leftmost + 2button plus hh oder min
 if (status == 1) {
 hh++;
 if (hh >= 24) hh = 0;
 rtc.setTime(hh, mm, 0);
 }
 if (status == 2) {
 mm++;
 if (mm >= 60) mm = 0;
 rtc.setTime(hh, mm, 0);
 }
 delay(250);
 break;
 case 0b0001000: //leftmost + 3button minus hh oder min
 if (status == 1) {
 hh--;
 if (hh < 0) hh = 23;
 rtc.setTime(hh, mm, 0);
 }
 if (status == 2) {
 mm--;
 if (mm < 0) mm = 59;
 rtc.setTime(hh, mm, 0);
 }
 delay(250);
 break;
 }

 delay(10);

}

void doTick(){

 // light the first 4 red LEDs and the last 4 green LEDs as the buttons are pressed
 // module.setLEDs(((keys & 0xF0) << 8) | (keys & 0xF));
 // hin und her lauflicht
 if (status < 1) {
 if (dir == 0) mybyte = mybyte << 1;
 else mybyte = mybyte >> 1;
 module.setLEDs(mybyte & 0x00FF);
 if (mybyte == 1) dir =0;
 if (mybyte ==128) dir = 1;
 }
 else {
 //module.setLEDs(0b11111111 & 0xFF00);
 module.setLEDs(0xFF00); //alle rot
 //module.setLEDs(0x00FF); //alle grün
 }
 // ende lauflicht

 //RTC.getTime(&time);
 time = rtc.getTime();

 //Serial.println(time.sec);


// my rtc seems to be buggy, so next lines to clean
 if (time.sec == 0 && time.min == 0 && time.hour == 0) { delay(10); time = rtc.getTime(); };
 if (time.sec == 0 && time.min == 0 && time.hour == 0) { delay(10); time = rtc.getTime(); };
 if (time.sec == 0 && time.min == 0 && time.hour == 0) { delay(10); time = rtc.getTime(); };
if (time.sec == 0 && time.min == 0 && time.hour == 0) return;


 //ss1 = time.getSecond();
 ss1 = time.sec;

 if (status < 1) {
 if (ss1 != ss){ //do nothing if the seconds didn't change since last display
 word decpoints = 0b00000000;

 if ((ss1 >= 20 && ss1 < 24) || (ss1 >= 40 && ss1 < 44)){
 mystring ="";
 int dd = time.date;
 if (dd < 10) mystring = mystring +" ";
 mystring = mystring + String(dd);
 int mo = time.mon;
 if (mo < 10) mystring = mystring +"0";
 mystring = mystring + String(mo);
 int yy = time.year;
 mystring = mystring + String(yy);
 decpoints = 0b01010000;
 //if (ss1 < 26) servo1.write(45);
 //if (ss1 > 39) servo1.write(135);

 }
 else {

 ss = ss1;
 //timenumber = time.getHour() * 1000;
 timenumber = time.hour * 1000;
 mystring = "";
 hh = time.hour;
 if (hh < 10) mystring = mystring +" ";
 mystring = mystring + String(hh);
 mystring = mystring +" ";
 mm = time.min;
 if (mm < 10) mystring = mystring +"0";
 mystring = mystring + String(mm);
 mystring = mystring +" ";
 //ss = time.getSecond();
 if (ss < 10) mystring = mystring +"0";
 mystring = mystring + String(ss);
 }

 module.setDisplayToString(mystring,decpoints);
 }
 }
 else //button to set the time
 {
 hh = time.hour;
 mm = time.min;

 switch(status) {
 case 1:
 mystring = "Hour" + String(hh) + " ";
 module.setDisplayToString(mystring,0);
 break;
 case 2:
 mystring = "Min " + String(mm) + " ";
 module.setDisplayToString(mystring,0);
 break;
 }
 }

}


I assume that the three #include are for DS1302 , TM1638, and not like another . Can I have that information , because when used the includes are lost. Thanks
The includes must be within ” “,so they are not removed from the website
You’re right. I corrected it:
#include
#include
#include <TM1638.h>
#include <DS1302.h>
on witch ide you compile it ? tried on 1.0.6 and 1.6.1 and have errors ?
where is a good ds1302 library ? Ive tried a few with no luck
no matching function for call to ‘Time::Time ()’
i need this project badly
I always use the newest one
Hi,
Where is Timer.h ?
thank you.
hi,
look here:
http://playground.arduino.cc/Code/Timer
Hey, nice projekt!
I wan to reconstrukt it, but in my stash i only found the RTC
CL1615. (Tiny RTC I2C Modules)
Is this the same?
An can you give us the connection for this?
Thank you 🙂
🙂
*gelöst*
CL1615 und DS1302 scheint identisch zu sein.
Verkabelung ist einfach, SCL und SDA an zwei
Analog-in vom Arduino, und sofort erscheint eine Uhrzeit.
Nur ? Wie stellt man jetzt die Zeit ? Sie geht ca 50 Minuten falsch….
Danke und Grüße
the code for setting hours and minutes with buttons should be in the code. Also to set year and month once per app.
Best regards,
Johannes
Hi Nico br Thank you for your answer, I think has a RTC but I wanted to test this clock because I could make a miniature circuit.